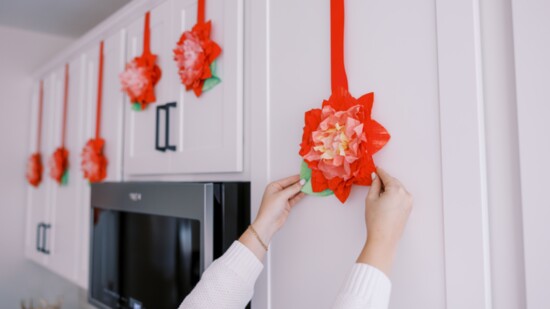
Add a touch of festive cheer to your home with this delightful DIY holiday craft! You'll create stunning Poinsettia flowers using simple supplies like coffee filters and paper plates, perfect for decorating cabinets, wreaths, or gifts. Gather your materials and let your creativity shine—here are the instructions! Experiment with using your poinsettias in different ways. Embellish lanterns, napkin rings, or make a garland using a long strand of ribbon. More detailed photos of each step on our website!
Supplies (makes 16): 1. Large bowls 2. Spoon 3. Water 4. Food coloring or acrylic paint in red, yellow, green, and blue 5. 200 white basket coffee filters 6. 32 white, 9” uncoated paper plates 7. Plastic bags or drop cloth 8. Scissors 9. Stapler/staples 10. Glue gun/glue sticks 11. 1.5” red ribbon 12. One command hook per cabinet
1. Group filters for dyeing: 64 dark red, 48 light red, 32 yellow, 48 green, and 8 left over. Add plates to the dark red group. 2. Make dark and light red poinsettia “petals,” yellow centers, and green leaves. Fill bowl with about 1 cup water. Add about 5 drops of red dye or paint and stir with spoon. Place one of the 8 leftover filters into mixture until saturated. Remove and place on plastic bags/drop cloth to dry. Experiment with making different darker/lighter shades in additional bowls, using remaining 7 left over filters to test color. The more dye/less water used, the darker the color will be. Dye all groups from step 1 their assigned colors. Color variation is great!
3. When dry, cut red and yellow filters into flower shapes. Fold each filter in half 3 times. Holding folded filter so that the point is at the top and the rounded edge is at the bottom, cut a V shape out of the bottom. Fold each plate in half twice. Holding folded plate with the point at the top and the rounded edge at the bottom, cut an upside-down V shape out of the bottom. Make cuts more curved than straight, as pictured. Cut green filters into leaf shapes.
4. Make individual poinsettias by stacking 9 filters on top of each other. Use 4 dark red filters on the bottom, 3 light red filters in the middle, and 2 yellow filters on the top. Staple together in the center. 5. Starting with the top filter, gently scrunch into a loose ball. Scrunch the second layer around the first. Repeat with all layers. Fluff and arrange. 6. Hot glue two paper plates together, staggered and stacked, then hot glue onto bottom of filter poinsettia.
7. Hot glue 1-3 green leaves onto the back of each poinsettia. 8. To hang on cabinets, measure how much ribbon needed to reach outside center to inside and cut. Hot glue poinsettia onto one end of ribbon and attach to cabinet with a knot in the other end of the ribbon around a command hook.
