At Art Parts, the creative process begins with the search. Kids can wander through bins of materials, sorting through wood scraps, bottle caps, shells, yarn, cardboard, gems, and whatever else catches their eye.
For Christie Hubley, founder of Tinker Art Studio & Clay Hub, that sense of discovery is exactly what makes the project work. For this feature, she invites families to create assemblage sculptures with found materials from Art Parts Creative Reuse Center.
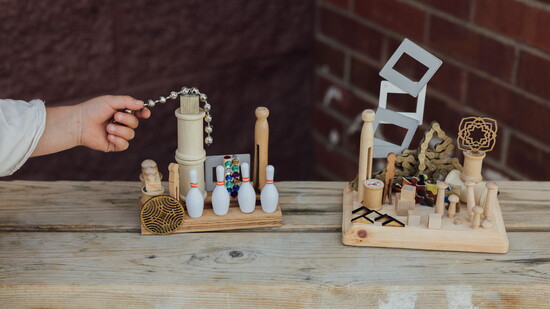
Assemblage sculptures are made by gluing objects into a 3-D form. The project is intentionally open-ended, giving kids room to choose, build, rearrange, problem-solve, and follow their own ideas as the piece takes shape.
Start with the Search
At Art Parts, the hunt is part of the process. Begin by looking for a strong base: something sturdy, flat, and large enough to build on. This piece helps direct the rest of the sculpture and gives kids a good starting point.
From there, look for medium-sized pieces that can create structure, like assorted wood scraps, cardboard shapes, lids, corks, or other interesting recycled materials. Then gather smaller details, or what Christie calls “bits and bobs,” to add texture, dimension, and personality.
Gems, shells, yarn, bottle caps, beads, and other small finds can become eyes, windows, patterns, decorations, or something else entirely. Art Parts often has “fill-a-bag” options for smaller pieces, which can be especially useful for this kind of project.
Christie recommends picking up tacky glue as well. Elmer's glue can work, but tacky glue dries faster, is sticky right out of the bottle, and has a little flexibility as it dries, making pieces less likely to fall apart.
Setting Up
Before kids begin building, take a few minutes to set up the workspace. Christie recommends working on an art tray, such as an old baking sheet. The tray gives the project a clear boundary, helps contain the mess, and supports independence by giving kids a defined space to work on their own.
Next, sort materials into small bowls, cups, or containers by type, size, shape, or color. This simple step can become part of the creative process. It also helps children slow down, notice what they have, and make more intentional choices.
Christie describes this kind of setup as an “invitation to create.” When materials are organized and presented thoughtfully, children are often more engaged and more independent in the process.
For younger kids, try introducing materials in stages. Start with the base and larger pieces, then bring out smaller details later. Too many options at once can be distracting, while a slower reveal keeps the project focused and playful.
Let the Child Lead
The heart of this project is not the finished sculpture. It is the decision-making that happens along the way.
“So much is out of kids’ control,” Christie says. “Giving children access to open-ended creative opportunities provides a safe space for them to take the reins.”
That can be the hardest part for adults. Instead of directing the project toward a specific outcome, parents can support the process by staying curious rather than taking over. Simple questions like “What are you thinking of adding next?” or “Tell me more about this part right here” help kids talk through their choices while still feeling a sense of ownership over the project.
At Tinker, Christie often reminds kids, “You are the artist. You get to decide.”
Materials
- A sturdy base, such as a piece of wood, a lid, a metal tin or tray, or another flat object
- Medium-sized found objects, such as wood scraps, corks, yarn spools, small containers, or whatever catches your eye
- Small detail pieces, such as gems, shells, buttons, beads, yarn, bottle caps, or other bits and bobs
- Tacky glue (or Elmer's with extra drying time or a low-temp hot glue gun)
- Small bowls, cups, or containers for sorting
- An art tray or an old baking sheet to work on
Process
- Set up your art tray as your workspace.
- Choose a sturdy base that sits flat. This should be your largest piece.
- Sort your finds into small bowls or containers by type.
- Arrange your larger and medium-sized pieces on the base to plan your design.
- Start gluing! Glue pieces into place, building upward or outward.
- Add smaller details, textures, and finishing touches.
- Let the sculpture dry fully.
- Display it!
Inspired by Louise Nevelson
For families who want to give the sculpture a more unified look, Christie suggests looking at the work of Louise Nevelson, an artist known for assemblage sculptures often painted in one solid color, such as black, white, or gold.
If the child is interested, painting the finished sculpture one color can help all the different materials feel connected and create a striking piece to display. But that step is only an option. The real value of the project is in the process: choosing, building, adjusting, and discovering that ordinary found materials can become something entirely new.
To learn more, visit TinkerArtStudio.com and ArtPartsBoulder.org