If you're doing a lot of yoga at home right now, you probably have also been told to do a lot of chaturangas by your virtual instructor.
I practiced yoga for years before I became a certified instructor, and it wasn't until I was in teacher training that I actually learned the correct way to do chaturanga dandasana. It's one of those poses that feels so different than it looks, so it's hard to know what you're actually doing! I recommend turning sideways next to a mirror while you practice this so you can see if you are in proper alignment.
The reason it's important to get it right is to protect your spine, neck, and shoulders and to prevent dumping into your lower back.
A Step-by-Step Guide to Chaturanga
From whatever pose you are transitioning out of, you will end up in a high plank. So if you're in downard facing dog, you'll shift forward into high plank. If you are in warrior 2 or reverse warrior, you'll cartwheel your arms forward and pivot on the balls of your feet to end up in high plank. Either way, you'll start in high plank!
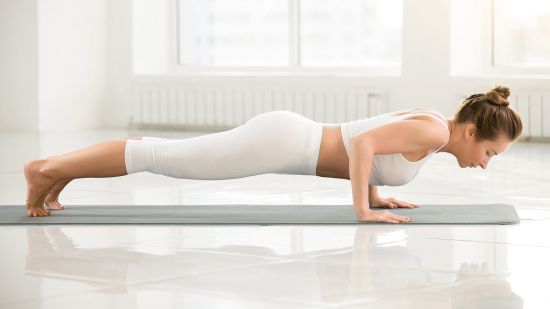
1. High Plank
Stack your shoulders directly over your wrists and draw your heels over your toes. Press the space between your shoulder blades up and pull your belly button up to your spine.
Look down between your hands or slightly out in front of your fingertips, but avoid looking up. You want your neck to continue a straight line from your spine up to the crown of your head.
Alternate Option: To modify this pose, lower your knees to the ground and lift your feet up towards the ceiling. Slightly shift your weight forward so your core is still engaged, and keep your shoulders over your wrists.
Breath: This is where you will inhale to prepare.
2. Chaturanga (Mid-Plank)
Keeping your legs exactly as they are, hug your elbows into your sides and bend them just enough to lower halfway to the ground. If your legs, stomach, or chest touch the mat, you've gone too far. (That's the part I was doing wrong for many years!)
It will feel like you are not actually as low as you are. This is why watching yourself in a mirror will be super helpful. It's better to just lower 1/4 of the way down than to compromise your alignment and dip into your lower back, so if you need to stop even before halfway while you build up your core and tricep strength, that's totally fine!
Alternate Option: Lower your knees to your mat like the alternate option for high plank and point your feet up to the ceiling. Squeeze your elbows into your ribcage and bend so that you are halfway above your mat. Even though your knees are pressed down on your mat, your hips and chest should still just hover above it.
Breath: Exhale as you lower yourself down.
3. Upward Facing Dog
You may sometimes see people do what looks like a swan dive here. That's not necessary and also not good for your spine! After you have lowered into a mid-plank, all you do to transition to upward facing do is flip your toes under so that you can press into the tops of your feet and straighten your arms again to press your chest up.
Keep your thighs off of your mat the whole time. As you flip your toes, engage your legs to keep them steady. Press extra hard into the tops of your feet after you have flipped your toes and hold. As you straighten your arms, keep your hips off your mat, pull your shoulders back, and press your chest forward. Look forward or slightly up.
Alternate Option: If you have your knees on the ground in your mid-plank, lower your feet down and press into the tops of your feet hard enough to lift your thighs off of your mat. As you straighten your arms, keep your hips off your mat, pull your shoulders back, and press your chest forward. Look forward or slightly up.
Breath: Inhale as you press up.
4. Downward Facing Dog
Press your hips up and shift your weight back. Either roll over your toes or flip one foot at a time so that you are on the balls of your feet again.
Your heels do not need to touch the floor here. The more important thing is, again, your spine. Press firmly into your thumb and pointer finger and push into your palms to flatten any air bubbles out. Pull your shoulders down your back and point your tailbone up to where the ceiling and the wall meet. Your goal is a flat back.
You will feel a stretch in your hamstrings. Once you are sure your shoulders are down and your back is straight and your tailbone is high, you can start to gently press into your heels for even more sensation in the backs of your legs if you'd like.
Alternate Option: This part is the same whether you were on your knees or your toes.
Breath: Exhale as you press yourself back.
How to Do a 'Not'-uranga
Let's face it—chaturangas are hard! It's a lot of work in your shoulders, and sometimes you just might not have it in you. That's OK. It is always an option, in any yoga class, to skip the chaturanga. The way you do it is go to high plank as if you were about to do the chaturanga, but keep holding high plank instead of lowering down halfway. You can also hold high plank with your knees on the ground as described above. This is still building great core strength, and your body is still engaged and doing work.
If you choose this option, you will not transition into upward facing dog. It can be very hard on your back to go from high plank straight into that position, so you will just continue to hold high plank. Then, when it is time to move into downward facing dog, shift your hips up and press your weight back. You can easily practice this transition by going from downward facing dog to high plank and back to downward facing dog again.
Please know that it's not "cheating" to skip a chaturanga during class, and any yoga instructor would want you to listen to your body and do what you need to do. It's better to skip a few chaturangas and still be able to do class again tomorrow than to force yourself to do all of them, hurt yourself, and not be able to practice for a few days!
Breath: Keep a slow, steady breath while you hold high plank. Exhale as you press back to downward facing dog.
Follow Hayley Hyer @hayhyer