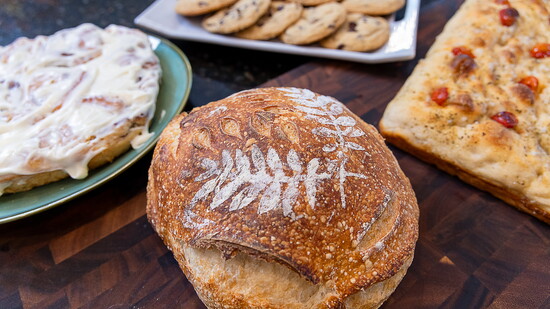
Sara King and Gena Petruk have shared more than four decades of friendship—from kindergarten through Badin High School, to marriages, raising children and conversations around the kitchen table.Today, they live just five minutes apart, where one more guest often joins them: a 200-plus-year-old friend named Mother.
Mother is Gena's sourdough starter, a living culture whose family tree stretches back more than two centuries. During the pandemic, a friend in California mailed the starter to Gena, who affectionately named her Mother.
Sara, already an avid baker, was intrigued by sourdough's reported health benefits. Gena shared some of Mother—along with her tried-and-true recipe—and Doughy Parton was born. The pair haven't looked back since.
"If you have a really mature, healthy starter, your bread will come out amazing," Gena says.
"When the recipe is followed,” Sara adds, “we've never had a bad loaf."
For first-time bakers, the process can seem a little mysterious. In reality, success comes down to feeding the starter, following the recipe and letting time do the work.
“When you take it out of the refrigerator,” Sara explains, “feed it equal parts flour and water, then let it sit out on the counter until it doubles in size. Once it’s doubled, mix the active starter with flour, water and salt called for in your recipe.”
Sara explains it’s really about patience.
"If it's not ready for the next step, don't move on,” she says. “If you rush the process, you won't have a good loaf."
Over the next two days, the dough rests, rises and is stretched and folded several times before cold-proofing in the refrigerator and finally baking.
Fortunately, that patience also comes with flexibility.
“The good thing about making sourdough,” she explains, “is you can make it around your schedule, no matter what schedule you have.”
Before leaving for work, Sara removes Doughy Parton from the refrigerator, feeds her and lets the starter grow on the counter throughout the day. By the time she returns home, DP has doubled in size and is ready for the next phase.
To keep their starters at a manageable size, Gena and Sara remove a portion before each feeding. Rather than throwing it away, that "discard" can be transformed into additional recipes like cinnamon rolls, cookies, pancakes, focaccia—even homemade pasta.
They recommend keeping things simple. A mason jar for the starter, a mixing bowl, a Dutch oven and a simple razor for scoring the dough are all that's needed.
One tip they hope every beginner remembers? Never wash sourdough starter down the drain.
"It turns into concrete," Gena says with a laugh.
Once you’ve mastered a basic loaf, however, the possibilities are endless.
Sara and Gena enjoy experimenting with flavors like jalapeño cheddar and Parmesan rosemary garlic, while fresh loaves are often served simply with butter, honey or homemade jam.
For Gena and Sara, making sourdough feeds more than an appetite—it nourishes the soul.
"It almost grounds you," Gena says. "It makes you slow down. It makes you pause. It really becomes a ritual.”
For the two friends, however, the greatest reward isn't what comes out of the oven. It's the time spent together and the joy of sharing homemade loaves with family, neighbors and friends.
"When somebody bakes you a loaf of bread, it really is a labor of love," Gena says. “It’s not a quick process.”
If you're inspired to try sourdough, their advice for beginners is simple: Find a friend who bakes. Not only are experienced bakers happy to share a starter, they're often happy to answer questions along the way.
“Name her. Love her. Feed her,” says Gena. “If you don’t name her, it’s bad luck.”
For Gena and Sara, every loaf begins with friendship—and every good starter deserves a name.
Sourdough Recipe + Timeline
BEFORE YOU BEGIN
Your sourdough starter lives in its own mason jar. Throughout this recipe, that starter stays in the jar until you're ready to measure 150 grams into a separate mixing bowl for your bread dough.
Ingredients
- 150 g active sourdough starter
- 350 g water
- 500 g flour
- 10 g salt
DAY ONE
Follow Steps 1-8 on the first day.
WAKE UP YOUR STARTER
Step 1
Remove your sourdough starter from the refrigerator.
Step 2
Before feeding your starter, remove a portion if you'd like to keep a smaller amount in the jar. This extra starter is called discard. Save it in a separate container for recipes like pancakes, cookies, cinnamon rolls, focaccia, homemade pasta or even to feed your plants.
Step 3
Feed the remaining starter in the original mason jar with equal parts flour and water (1:1 ratio). Let it sit on the counter until it doubles in size.
MIX THE DOUGH
Step 4
Once the starter has doubled in the original mason jar, measure 150 grams of the active starter into a separate mixing bowl.
Return the original mason jar—with the remaining starter—to the refrigerator. It will become the starter for your next loaf.
To the mixing bowl, add:
- 350 g water
- 500 g flour
- 10 g salt
Mix until no dry flour remains and a shaggy dough forms. Cover the bowl with a towel or shower cap and let the dough rest.
STRETCH + FOLD
Step 5
Complete the first Stretch + Fold. Cover and let the dough rest for 30–45 minutes.
Step 6
Complete Stretch + Fold #2. Rest another 30–45 minutes.
Step 7
Complete Stretch + Fold #3. If adding ingredients like jalapeños, cheese, herbs or other mix-ins, fold them in during this step. Rest another 30–45 minutes.
Step 8
Complete Stretch + Fold #4. Leave the dough on the counter to bulk rise until doubled, usually overnight.
DAY TWO
Finish the recipe by following Steps 9-12 on the second day.
SHAPE + COLD PROOF
Step 9
Shape the dough into a loaf.
Place it into a proofing basket (or a bowl lined with a towel).
Cover with a plastic bag and refrigerate for 5–7 hours.
BAKE
Step 10
Preheat the oven to 450°F with the Dutch oven inside and the lid on.
Step 11
Turn the dough onto parchment paper or a silicone baking mat. Dust lightly with flour if desired and score the top with a razor.
Step 12
Bake:
- 25 minutes with the lid on
- 20 minutes with the lid off
Allow the loaf to cool before slicing.
TIPS
- Start with a healthy, mature starter.
- Don't rush the process.
- Never pour starter or discard down the drain.
- Name your starter.
Optional: For a tangier sourdough flavor, leave the shaped dough in the refrigerator overnight before baking.
For Gena and Sara, making sourdough feeds more than an appetite—it nourishes the soul.