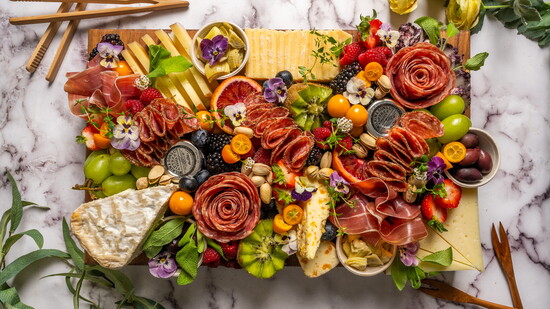
The food board trend took off during the pandemic as people sought creative ways to enjoy themselves at home. Years later, it remains wildly popular, transforming the simple cheese-and-cracker spread into an intricate display of culinary artistry. Food design has become a cornerstone of home entertaining, elevating casual gatherings into Instagram-worthy events and turning everyday snacking into a true art form.
Whether you're hosting a dinner party or enjoying a quiet night in, these versatile grazing boards can elevate any dining experience from ordinary to extraordinary. The best part? You don't need professional expertise or expensive ingredients to create something beautiful. Here's a simple how-to guide for creating your own culinary masterpiece at home.
Ingredients used:
- Brie
- Blueberry vanilla goat cheese
- Iberico
- Vintage Havarti
- Apricot Stilton
- Soppressata
- Peppered salami
- Honey/jam
- Olives
- Roasted artichoke heart
- Fruit for color (grapes, strawberries, raspberries, blackberries, blueberries, goldenberries, kiwi, blood orange and kumquats all work great)
- Nuts
- Herbs & edible flowers for garnish
Serves: 6-10
Instructions:
Slice all cheeses and prep fruit before getting started. My best tip for slicing triangular cheeses is to slice along the triangular shape to keep its shape. If you are slicing a rectangular-shaped cheese, it's best to slice straight down the smaller side and keep it as a nice, easy-to-eat slice. As a basic rule of thumb, you want 1 ounce of cheese and 2 ounces of meat per person for an appetizer portion.
I like to place the bigger items first, which are usually the cheeses. There is no right or wrong way to arrange them – I normally just spread them out on the board while trying to maintain a balance between the shapes and textures of each cheese.
Next, I place the meats. Again, balancing them throughout the board is key.
The next step is the fruit. I like to use seasonal fruits to ensure I have the freshest and best flavors. I work from the biggest fruit to the smallest, balancing the colors around the board.
Once the board is full, I use the nuts to fill any small holes along with blueberries. Finally, I add the herbs and edible flowers for garnish.
After all ingredients have been placed, step back and admire your creation! Your board is more than just an arrangement of food – it's a conversation starter, a feast for the eyes, and an invitation to gather and share. Boards can also be made ahead of time. Simply cover or wrap your board in plastic to be stored in the fridge until your guests arrive.
Remember, there's no wrong way to create a grazing board — the joy is in the process and the sharing, making each board as unique as the person who assembled it.
For more food board tips and how-to's, follow Andrea on Instagram at @hungrydreacreations.
